By John Kriz
This is a more personal story – a story of my on-going journey as a home winemaker. To borrow a well-worn phrase, there have been thrills of victory and agonies of defeat (including five gallons of hard cider that sadly became five gallons of vinegar). Though I have received several awards for my wine at local agricultural fairs, I am by no means an expert, or even within shouting distance of becoming one. However, I have learned a thing or two, and this is that story, with some tips for those among you who are interested in trying winemaking yourself.
Note: There are myriad laws on alcohol production, use and sale. Be sure you understand and follow them. And if you choose to drink, always drink responsibly.
Where Wine Comes From
In essence, wine is grape juice that has been fermented. Fermentation, for those who have forgotten your organic chemistry, happens when a sugary liquid is mixed with yeast. The result: The yeast eats the sugar, and converts it to ethyl alcohol and carbon dioxide. You can also make wine from other sugary liquids, such as juice from honey (called mead – remember Beowulf?), apples (hard cider), pears (perry), various other stone fruits (such as cherries and peaches) and soft fruits (such as elderberries, blueberries and raspberries). I have made wine from apples, blueberries, honey (I’m a beekeeper, too) and elderberries (it’s like a Zinfandel, very fruit forward), as well as exotic stuff like Melomel (a great crossword puzzle and Scrabble word, it’s a mix of honey and soft fruit — fabulous) and Cyser (honey and apple juice). These latter two are part of my Robin Hood and His Merry Men collection. Winemaking provides opportunity for creativity.
Getting Started
First time out I suggest getting a kit. These generally come with instructions (follow them!), juice, the chemicals you’ll need and yeast. Most all of the guesswork has been taken out, and your chances of producing something decent is substantially increased. A kit helps you get a feel for the steps involved in a simple way.
Also remember:
• Be sure you have all the ingredients and equipment (more on this later) you’ll need before you start.
• Be sure your ingredients have not spoiled.
• Be sure your equipment is clean. This Is a Big Deal. Wine is sensitive to contamination. I know one fellow who (unwisely) cleaned his equipment with Dawn dishwashing liquid. He ended up with 24 gallons of Dawn wine – yuk. Only clean and sanitize your equipment with chemicals specifically approved for wine and water. And any cleaning tools (sponges, rags, brushes) should be chosen carefully and only used for winemaking.
• Read your recipe before you start. Seems obvious, but…
Go slowly, be careful. There is no ReDo button.
Some Basic Stuff You’ll Need
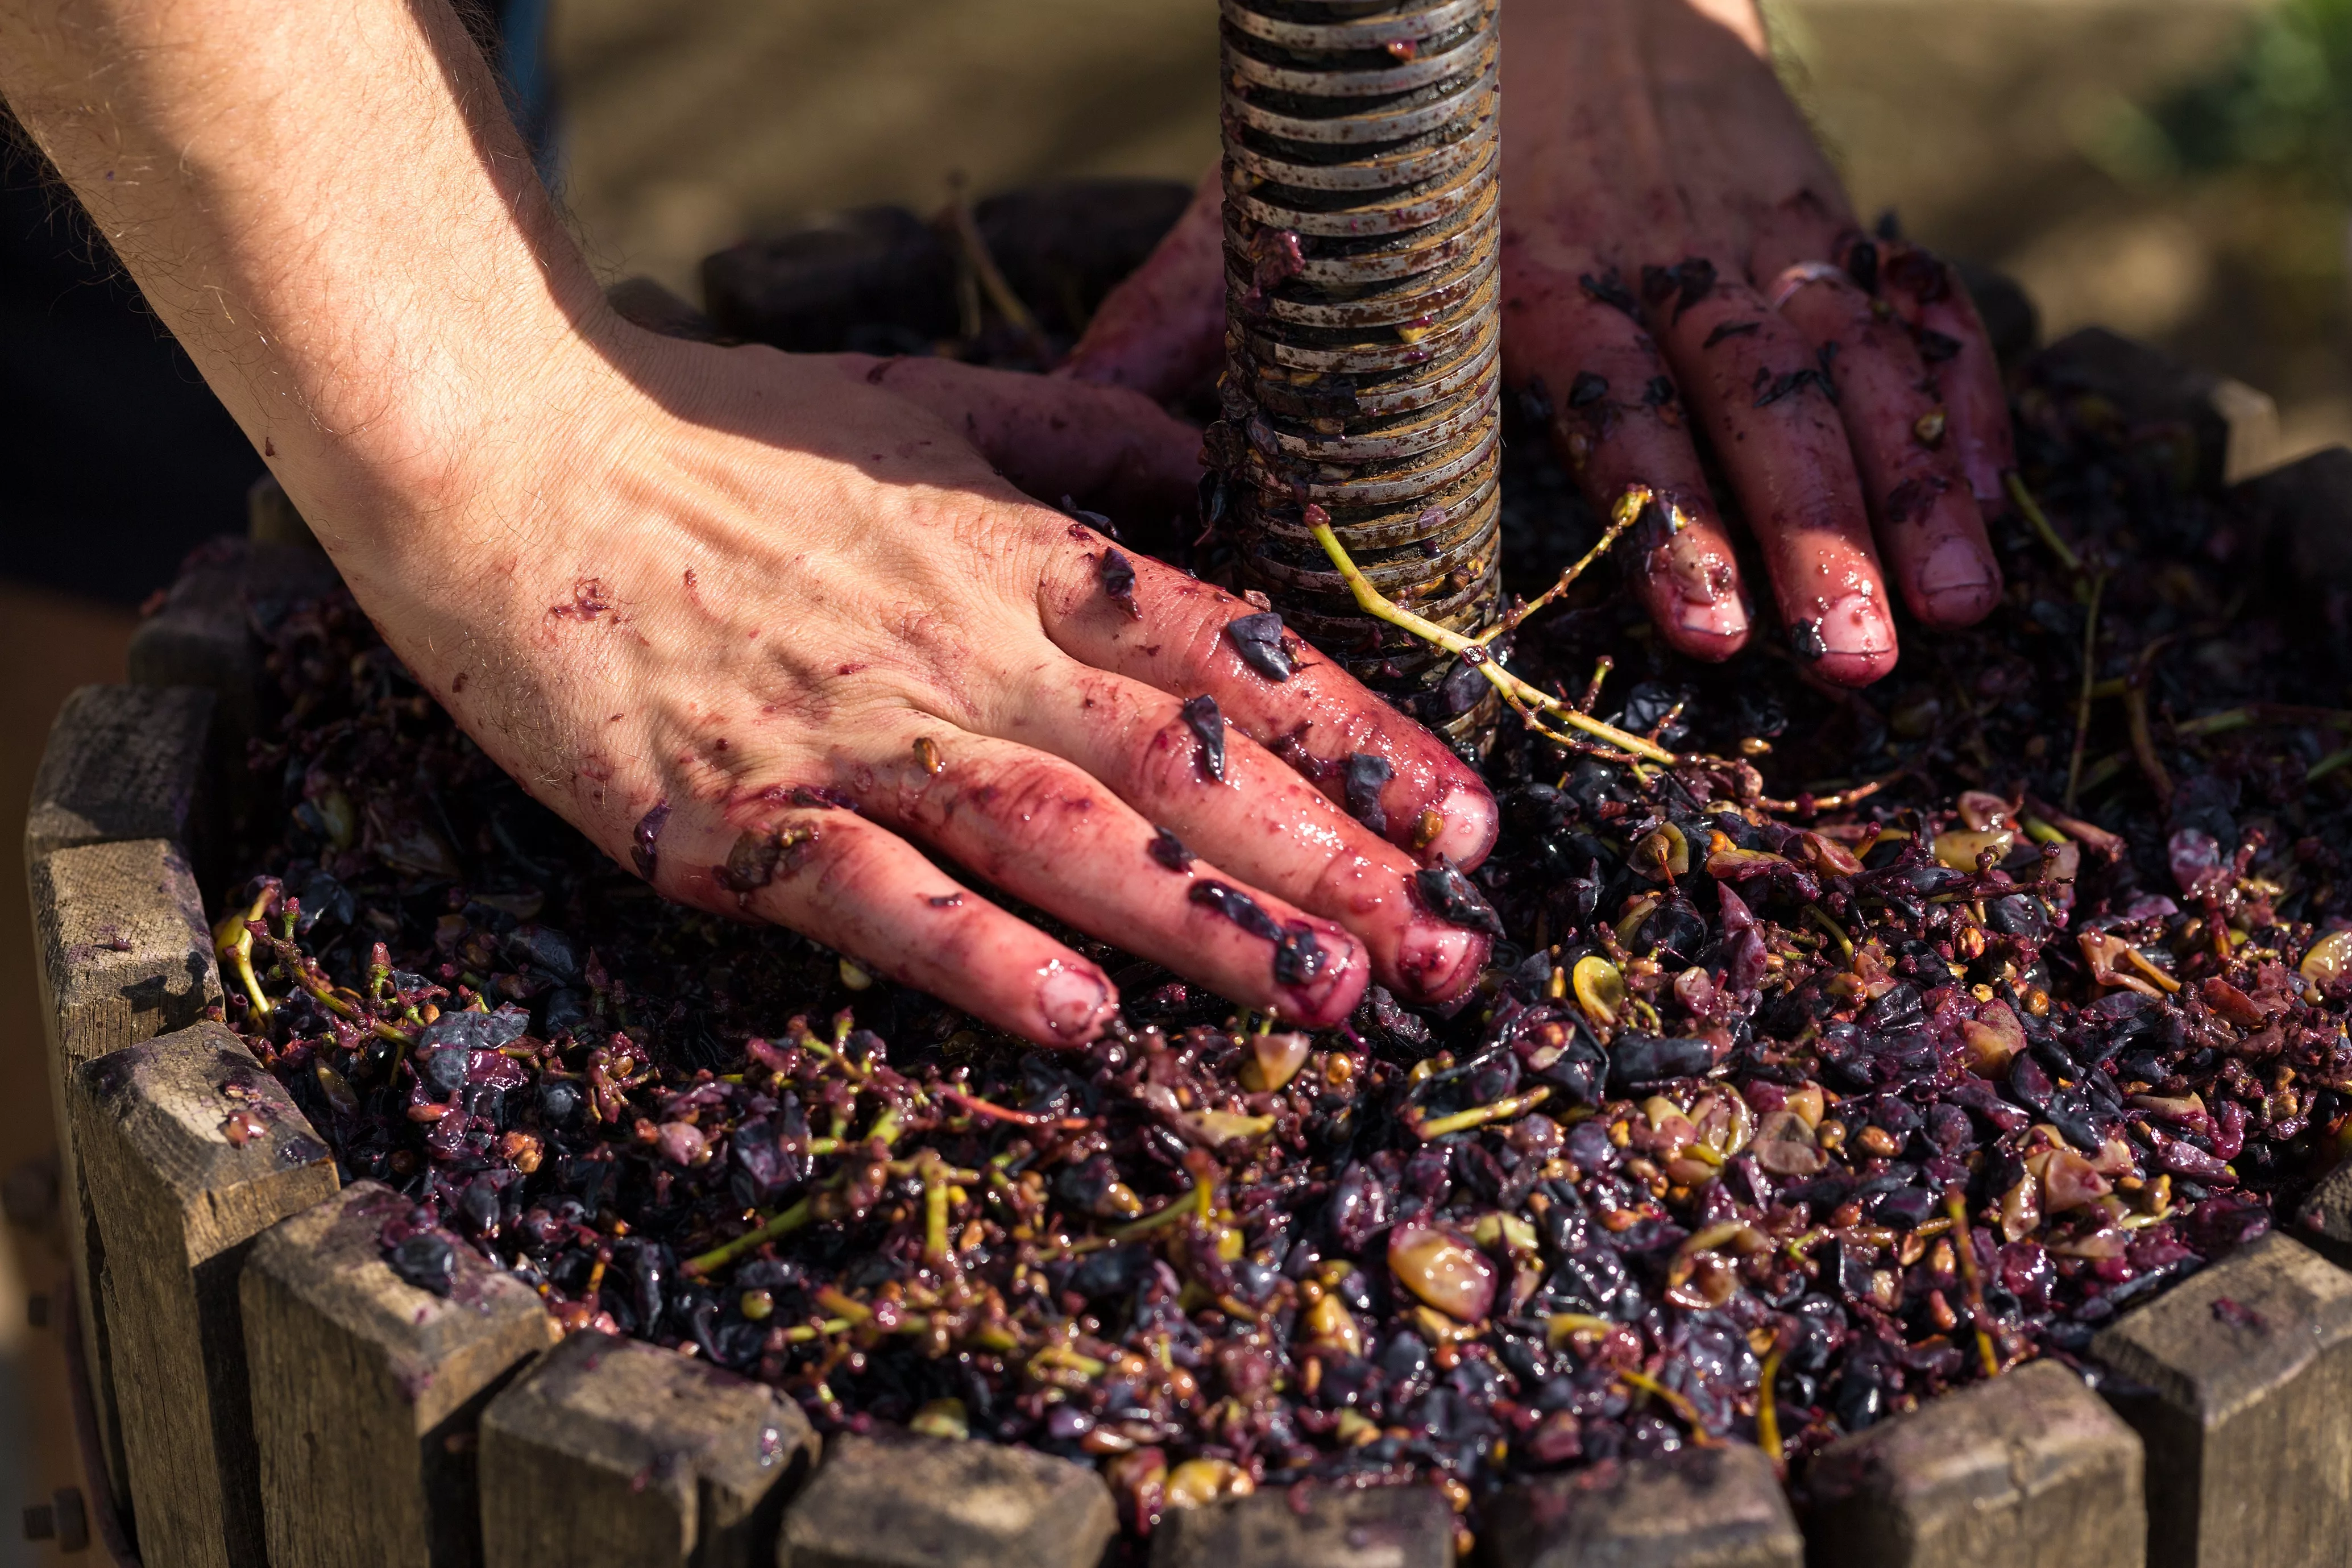
• Juice. Try the internet. It either comes in a concentrate (add water – works fine) or as ‘must’ which is raw juice, used as-is. Be very cautious buying juices from a grocer. They often contain preservatives or something else that will adversely affect your winemaking. When I make hard cider or Cyser, I get my raw apple juice from an orchard I trust. If you want to crush your own grapes, it’s a chore. To get 5 gallons of juice you’ll need 100-125 pounds of grapes. Plus a wine press. And a forgiving spouse.
• Fermentation Vessels. You’ll need at least two: one for fermentation and the other into which you’ll ‘rack’ your wine (more later) for further fermentation and aging. Sizes for home winemaking are typically 5-6 gallons. This makes it liftable (5 gallons of water weighs around 42 pounds) and will produce about two cases. Choices include:
o Specially made plastic buckets (My favorite – so easy to use). Most have spouts for easy racking and bottle filling, tight closures and an aperture for the airlock (see below). Plus cleaning is simple.
o Glass Carboys. These are big glass bottles that are heavy, breakable, hard to lift and difficult to clean.
o Wooden Kegs. They look cool, but are expensive, heavy, hard to handle and have short lives.
SIDEBAR: Oak
If you want to oak your wine, you can do this by adding oak sticks, balls, cubes or chips to the must. They work great. Why oak? It adds flavors to the wine, such as caramel, vanilla, coconut, clove and smoke. By using oak sticks, etc. you can be very precise on how much oak you want. You can also use toasted oak, meaning it’s been charred. Also regarding oak, there are three basic choices: 1) American Oak (quercus alba), which is White Oak. Why? White oak does not leak. If you’re making a wine barrel, you do not want leaks. Ditto if you’re building a ship. 2) French Oak (quercus robur) and 3) Slavonian Oak (quercus robur slavonica) from the Croatia/Hungary/Serbia region (and the oak’s name varies by region). Each type is a bit different, and there is terroir in oak just like in wine. There are endless discussions on oak – how much, how long, which type, new vs. old barrels.
• Chemicals. Don’t be scared. Your recipe will guide you. Just be sure they have not gone off.
• Yeast. There are dozens upon dozens of yeasts. Your recipe will guide you. Each yeast has characteristics that make it optimal for particular types of wines. Some yeasts tolerate colder or warmer temperatures. Some can generate higher alcohol levels. Some are best for white wines, some for red. If you simply leave your juice out, nature will take its course and so-called wild yeast will establish residence and it will begin to ferment. Is this OK? Some people like wild yeasts as they can generate interesting flavors. But…it’s a crap shoot on exactly how the wine will turn out. Could be great, could be dreadful. Yeast affects flavor, so its best to use the appropriate wine yeast. If using dry yeast, be sure to ‘proof’ the yeast before ‘pitching’ it (adding it to the must). How to proof yeast? Use a clean coffee mug, and add half a cup of tepid water and a teaspoon of white sugar. Then add the yeast. Mix. When you see it foaming after a few hours, it’s ready to ‘pitch’. Proofing the yeast gives it a head start and you’ll get a better fermentation.
SIDEBAR: Stuck Fermentations
Keep some KIV-1116 or EC-1118 yeast around to try to fix a stuck fermentation. What is this? It’s when your wine refuses to ferment, or just stops fermenting before you want it to. Why does this happen? My best answer is it just does. What to do? These yeasts are the ‘big guns’ of fermentation, and by adding them to a stuck fermentation you can (usually) get it going again.
• Airlocks. Get a few. They have a tendency to break at inconvenient times. Airlocks are used on fermentation vessels and allow the carbon dioxide from the fermenting must to escape, but prevent oxygen from entering. Oxygen causes oxidation, which causes spoilage – sort of like leaving leftovers uncovered in the refrigerator. Always have one in place in your fermentation vessel.
• Bottles. Buy new ones, all the same size. Trying to reuse used wine bottles of various shapes and sizes is a recipe for madness. Pick a shape and color you like and stick with it. There are two main bottle types: Plain old wine bottles (750ml size) and champagne bottles (also 750ml). The latter are sturdier and are used for sparkling wines. Also, keep your empty bottles, be sure they’re clean (and you’ll need to buy a special wine bottle brush) and reuse them. I have had many bottles for over twenty years.
• Hydrometer. This is used to test specific gravity. By comparing the starting specific gravity reading of the must with the reading once fermentation has stopped, you can determine the alcohol level. As fermentation occurs, and the alcohol content rises, the specific gravity changes because different liquids have different weights for a given volume. Sugary water has a different weight (specific gravity) than a liquid whose sugar content has been converted to alcohol. Search the internet and you’ll find simple tables that will translate your two readings into the alcohol content. Also, your initial reading will tell you the ‘potential alcohol’ of your must, or the maximum alcohol level attainable assuming you ‘ferment to dryness’. If you want some residual sweetness in your wine, as you monitor your rising alcohol levels with new readings, you can stop the fermentation whenever you want. How to do this? Add potassium metabisulfite (called Campden Tablets in winemaking) to the must.
Closures. There are several choices.
• One is screwtops, which are increasingly common in wine. At home, these are not possible as they require industrial equipment you won’t have. Skip it. (You can buy specially threaded bottles and do-it-yourself screwcaps but I have found they work poorly and are expensive.)
• Bottle caps. Don’t laugh. If you’re using champagne bottles, bottlecaps are easy to use and effective. You will need to buy a bottle capper device. The alternative is a champagne cork (plastic or actual cork) but these are very difficult to insert.
• Corks. There are four basic choices. First is a ‘straight’ natural cork made from a single piece. Second choice is a ‘straight’ composite cork, which is comprised of little bits of cork glued together. The risk is the wine touches the glue, and these corks tend to shred when removed. Third choice is a straight plastic cork. These are difficult to insert using home equipment. Fourth is a mushroom cork. These use either composite or plastic corks and have a plastic top. They’re common in scotch and bourbon bottles. The good news is they insert easily with no equipment. The bad news is the seal is not tight, so there’s a risk of oxygenation. ‘Straight’ natural cork tends to work best. You’ll need a cork inserter. You prepare the corks for insertion by placing them in a vegetable steamer on your stove, and steaming them for ten minutes. This makes the cork pliable and easier to insert.
SIDEBAR: CORK
Cork is tree bark (yup) from a special type of oak (quercus suber) with most of the forests found in Portugal. The cork/bark is peeled off the trees every ten or so years. This does not hurt the trees. These cork oak forests are important environmentally, as they are pretty much left alone except for bark harvests, chemicals are avoided, and the wildlife love them, including some endangered species.
• Neck Capsules. These are those bits of plastic or pliable metal (often aluminum) around the tops of wine bottles. Why are they there? Today, they’re really decorative atavisms. But in pre-industrial times they had a purpose. Back then wine bottles were individually hand blown by a glassmaker, and the size and shape of the apertures varied. Plus corks (the kind from bark) were individually hand cut, more or less to the proper size. The upshot is that the cork might not fit tightly in the aperture, and there would be a risk of oxygen infiltration, and thus oxygenation and spoilage. What to do? Take some wax and pour it over the top of the corked bottle. That would help seal the bottle, and it was easily removed. Do we need neck capsules on wine bottles today? They’re traditional and look nice. Most of the ones for home winemaking are heat-shrink plastic.
• Labels. By all means label your bottles once they’re filled. You can go cheap and write on masking tape, or you can order custom labels. There are many pre-designed labels available which you can customize with the type of wine, date bottled, your name, etc. And you can add custom art if you’re so inclined. The best ones are peel and stick, and come off easily so when time comes you can remove the old label easily and reuse the bottle.
The Process, and More Tips
First, follow the recipe. These can be found on the internet, from many home wine equipment suppliers, and in books.
Remember: If you want to crush your own grapes, it takes 100-125 pounds of grapes to generate five gallons of juice. And you’ll need a fruit press. These are not cheap and are a hassle to use. So purchased must or concentrate is much easier. If you’re making wine from, say, blueberries, it’s a different story. For a five or so gallon batch you’ll need maybe 8-9 pound of blueberries. I freeze them, and then run them briefly through a food processor and dump the juice and shredded blueberries in a fruit bag, which can be purchased from wine supply stores. It’s essentially a big tea bag. Then the full fruit bag is put in the fermentation vessel with water. I have made wine this way and it works fine.
If you use concentrate and thus need to add water, avoid municipal tap water as it likely has fluoride, chlorine and other stuff you do not want. If you have decent well water, that’s OK. If not, consider buying natural spring water from the grocer.
As to racking, this is transferring the wine from one vessel to another. The idea is to leave the heavy gunk that falls to the bottom during fermentation in the first fermentation vessel, and to transfer only clear(er) wine to the new fermentation vessel. You’ll likely do this three or four times before bottling to help clear your wine. By using those plastic fermentation vessels, this is easy as all you do is put the full vessel on the kitchen counter with the spigot hanging over the side, place an empty vessel on the floor, and open the spigot. Gravity does the rest. If your fermentation vessel does not have a spigot you’ll need to use a siphon. They’re a bit of a hassle.
Once your wine is ready for bottling, place the full fermentation vessel on the kitchen counter, put an empty bottle under the spout and slowly fill it. Leave some headspace for the cork. First fill the bottle, then cork it, then add the neck capsule (if you want) and finally add the label.
Be sure to take notes about what you did and when, and especially your hydrometer readings and dates, and racking dates.
Your wine should begin to ferment within 24 hours after you’ve pitched the yeast. If not, you likely have a stuck fermentation. Most of the sugar-to-alcohol conversion will occur in the first few days of fermentation. You’ll see your airlock vigorously bubbling away, and you’ll smell it, too. (Smells OK.) Fermenting wine does not like cold (shuts down the fermentation) or heat (cooks it). As a rule of thumb, keep it around 75 degrees. Some wines need a few months to be ready for bottling. Some a year. And once bottled you’ll likely want them to mature a bit. Cheers!
John J Kriz is a 30+ year resident of New Canaan. The opinions expressed are his own.