From John Kriz
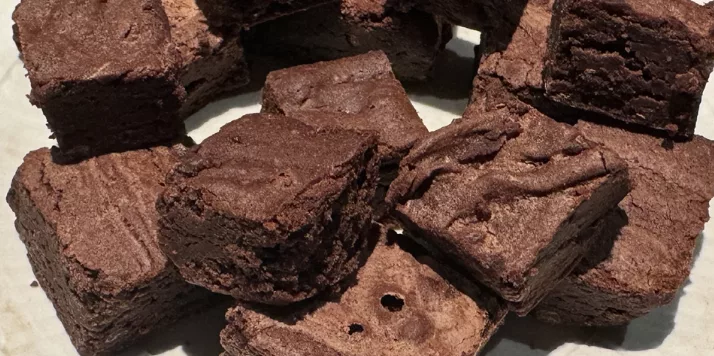
Publisher’s Note: In the midst of election season, where tension and division seem as present as campaign signs, John Kriz’s gluten-free chocolate brownies have become the unlikely hero we didn’t know we needed. These brownies didn’t just take the top spot in the gluten-free category; they won the blue ribbon overall, proving that sometimes the simplest comforts—like a perfectly baked treat—can bring people together.
Judges and tasters alike at a fair last summer were wowed by these brownies, and it’s easy to see why. Made with rich chocolate, they offer something that feels both wholesome and decadent, a reminder that good things don’t need any extra ingredients or labels to stand out. They’re a small, but much-needed comfort in a season where we’re all craving a bit of sweetness and simplicity.
Maybe we should all take a cue from John’s baking and find ways to come together, one bite at a time.
Whether you’re afraid of baking or an expert, everyone is looking for an easy and appealing dessert recipe. That ‘go to’ recipe is my Triple Death by Chocolate Brownies. I have been using this brownie recipe for a few years now — always with good results. I also have regularly entered these brownies in competition at the Cannon Grange Agricultural Fair, held annually by Cannon Grange (www.cannongrange.org) in the Cannondale section of Wilton for 92 years, and was awarded (another) blue ribbon at the August fair. And who doesn’t like chocolate brownies??
The Recipe:
1) This recipe uses a 9X13 inch pan. Grease it with butter or decent cooking spray.
2) Melt 2 sticks of butter (not margarine) with 8 ounces of chocolate. Use only high quality bittersweet chocolate — the sort that comes in bars for eating. Use only chocolate that’s at least 75% cocoa, and no Baker’s chocolate. It’s also recommended that you use half one brand and half another, or even a third/a third/a third. Chocolate flavors vary depending on processing and terroir. Good brands are Lindt & Sprungli, Ghirardelli, and Green & Black, but there are others. Never use flavored chocolate. You can melt the butter and chocolate in a double boiler, or in a microwave. Be sure to break the chocolate up into small pieces before melting. I have used a microwave, and results are fine, but do not overdo the microwave. Set aside to cool a bit.
3) Using a small bowl, mix 1 tbs of vanilla extract (real vanilla extract) with 1 tsp of expresso powder. Set aside.
4) Get a big bowl and mix 4 large eggs. Beat them hard, so they get fluffy. Best to use an electric hand mixer.
5) Add a pinch of sea salt, 1 cup brown sugar and 1 cup white sugar to the eggs in the big bowl. Add the sugars slowly to reduce clumping. Add the coffee/vanilla mixture. Mix. Hand mixing works best for me for this stage.
6) Add 1 cup flour, slowly, and mix by hand. I use gluten-free flour. OK, I get it: Gluten-free flour doesn’t rise, and whatever you bake with it is dense and crumbly. That’s usually true, but not here. You want the brownies fudgy — somewhere between actual fudge and cake. Gluten-free flour does that better than ‘regular’ flour. There are many gluten-free flour mixes on the market. Whatever ones I have used have worked. Plus, your gluten-free friends will thank you.
7) Mix in a half cup of semi-sweet, gluten-free mini chocolate morsels by hand — a mixer just shreds them. If you really like bittersweet chocolate, use those, but semi-sweet provides some diversity. The mini morsels give the final product some crunch, and makes the brownies’ mouthfeel more complex.
8) Pour batter into the pre-greased pan. Place in pre-heated 350 degree oven.
9) Cook for 30 minutes or so. Ovens vary, so you need to monitor. PRO TIP: When you test the brownies, you want to take them out to cool when they are slightly underdone. They’re a bit underdone when the knife or skewer you’re using comes out a bit gooey. Why? Because when you place the brownies out to cool, they’re still hot and will continue to cook a bit longer. Take them out to cool when they’re ‘done’ means they end up being a bit overdone, and dry.
10) Once cool, chill. Makes cutting them far easier.
11) Eat!


